

Do you love to document your travel adventures? If so, a blog is an excellent way for you to combine your passion for travel with your knack for storytelling.
If you are an active (or aspiring) digital nomad, starting a travel blog could be the next logical step to having a reliable way to support your lifestyle.
A travel blog is an exciting business plan that will lead to many opportunities for free hotel stays, flights, and other products and the chance to make a living doing what you love.
Considering that a study showed 50% of travelers worldwide use the web as a source of inspiration for vacations, it’s no wonder that Travel blogging has become increasingly popular as time goes on.
If that sounds interesting to you, then read the rest of this review to discover the simple 10-step process for how to start a travel blog – and make money from it.
Editors Note
This guide is extremely DETAILED and explains everything you need to start a Travel blog. I’ve been at this blogging stuff for over 8 years and have built a business making $20,000 per month, so I have a lot of helpful advice for you newbies out there.
If you get stuck or need advice, I HIGHLY recommend that you get my 100% FREE blogging course by clicking here. If that doesn’t help please contact me directly and I’ll help you out for free.
How to Start a Travel Blog in 10 Steps:
People start blogs for a myriad of reasons. For instance, some just love to travel and want a blog to support their lifestyle, so I may recommend they set up a lifestyle blog instead if they don’t travel ALL the time and make travel a small part of it.
Others want to use a blog to get into the tourism industry and tourism boards or become influencers – and there are dozens of reasons in between.
Here are some reasons why you should start a travel blog.
- Get Free Products: Travel bloggers typically get a ton of free stuff, including flights, hotel stays, sponsored trips, etc. This is a great incentive to start a travel blog for someone who loves to travel.
- Make Money: If you follow the right strategy for building and growing your blog, you’ll soon be able to start making real money from your blog with blogging courses, posting regularly, ads on social media channels or social media platforms, collaborations with other bloggers, and more.
- Build a Following: For anyone who wants to build an audience in the travel industry, a blog is a great way to do so.
- Share Experiences: If you are someone who simply loves to document their travels, you can use your brand new blog to share your experiences and travel blogging tips with the world and help others create their own.
- Grow a Community: When starting a travel blog, you can use it to build a travel blogging community of engaged readers around the travel topics that you write about, such as travel tips.
Step 1: Decide the Focus of Your Travel Blog
There are already a lot of travel blogs out there. But that doesn’t mean you can’t start your own successful and profitable travel blog.
All you need to learn when deciding how to start a travel blog is the right strategy and a simple step-by-step guide and plan to follow – and that plan starts with deciding the focus or direction of your new blog.
This is simply how you intend to position your blog. For instance, you might decide to collaborate or build a community for travelers.
Maybe your main focus is making money from your blog. Whatever it is, that needs to be your first decision, as it will guide the rest of your blog creation process moving forward.
Here are some ideas for how you can position your new travel blog:
- Instagram influencer
- Digital nomad
- Adventure junkie
- “I literally don’t have a home,” travel blogger
- Travel the world on a shoestring budget
- Focus on travel points, travel insurance, travel gear, VPNs (e.g. NordVPN), etc.
Step 2: Choose Your Niche
2020 and 2021 have not been incredible years for the travel industry, but it’s important to remember that the economy is an individual thing.
Some people can’t make it in the best of times, and others build a successful travel blog and business in the worst of times.
If you are serious about starting travel blogging, this might be the perfect time for you to do it so you can come out of the current global pandemic at the top.
Once you’ve decided on the focus of your travel blogging, your next step is to choose your travel blogging niche. A travel blogging niche is a smaller, specialized segment of the market that you will be focused on with your travel blog.
Having a serious travel blog that talks to everyone about everything will make it hard for you to rank on Google search and other search engines as you’ll be competing with much more prominent sites. This, in turn, will make it hard for you to build an audience of engaged readers for your own blogs
Instead, you need to specialize in a specific topic within the broader industry. In other words, pick a corner, and dominate it to boost your travel blog success.
To help you jumpstart your brainstorming, here are a few ideas of travel blog niches to consider:
- Travel hacks
- Creating a travel diary of sorts
- Food / Reviewing restaurants while traveling
- Safety while traveling in various places (from South America to Asia and Africa)
- Rating lodging accommodations while traveling
- Travel necessities, such as insurance, VPNs (important for going around geo-blocked content), etc.
- Transportation in different countries/cities (from South America to Asia and the whole world)
The list goes on.
You can even combine travel with additional aspects such as cooking, musical festivals, ancient landmarks, family vacations, traditional cuisine, etc. Travel and Fashion, in particular, is a trendy niche.

(Source)
If you have trouble finding a niche, think of the travel websites and blogs you enjoy visiting.
Make a list of the types of topics they talk about, and this should help you narrow down what you might be interested in writing about.
Step 3: Choose Your Blogging Platform
The next few steps you should learn when learning how to start a travel blog can get a bit techy. But don’t worry. I go over the technicalities to make it simple for anyone to understand, even those with zero web design experience.
Your travel blogging platform is the system that enables you to publish articles or posts on your blog. There are many different options to choose from, including free domain hosting platforms like Blogger, Wix, Squarespace, and paid blogging platforms.
Each option comes with its own set of pros and cons, and while most beginner bloggers tend to choose a free domain name and free platforms, those platforms come with a ton of drawbacks.
Sure, they are fine for anyone who wants to get a feel for the travel blogging experience without investing any money. But, if you’re going to make an income from your own travel blog, you won’t be able to do so when using a free blogging platform.
For one, those platforms have an unprofessional look (e.g., “MyTravelBlog.Squarespace (dot) com” vs. “MyTravelBlog (dot) com”), which will make it hard for you to gain your audience’s trust – and people don’t buy from you unless they trust you.
Also, free platforms tend to display their own ads on your website, and these may not even be aligned with the type of content on your blog, which many readers might find offputting.
And, if the host website were to be out of commission, you would lose all your content, and all your hard work building a travel blog would’ve been for nothing.
So what is the alternative?
I recommend using self-hosted WordPress (WordPress (dot) org). Here’s why.
Reasons to Use Self-Hosted WordPress Blogging Platform
- WordPress platform is free to download and use
- It’s easy to install WordPress with one click
- Thousands of free and paid WordPress plugins extend your site’s functionality.
- There are affordable and premium themes for no-code website customization
- You can monetize your travel blog in many different ways with a self-hosted WordPress Account
- When you Install WordPress Blog, you have access to a fantastic customer support team
- Helpful WordPress dashboard with everything you need for your site’s summary and status
Now that we’ve established that installing the WordPress web blogging platform is ideal for your new blog instead of free hosted platforms, let’s move on to the next step.
Step 4: Decide Your Domain Name
The next step in our step-by-step guide is to learn while you try to understand how to start a travel blog is choosing a name for your travel blog. The name you pick will serve as a foundation for your brand, so it’s essential to take the step seriously.
When you start blogging, try to stay away from overused travel buzzwords like “Wandering,” “Wanderlust,” “Vagabond,” “Nomad,” “Roaming,” etc. Instead, find unique, non-cliché words that will set you apart from other travel bloggers.
When picking a blog name, you need to get creative while keeping some best practices in mind.
Here’s a quick look at the main points in the article:
1. Buy a .com Domain
There are a lot of different travel-focused domain name extensions, including .travel, .guide, .vacations, etc. But, the best thing to do, in my opinion, is to purchase a .com domain. It’s what the web is built on, and it’s what your audience will most easily remember.
2. Choose a Broad Name
The travel industry is broad, and although you need to pick a specific niche within the industry, you still need to keep your travel blog name broad to give yourself the ability to expand in the future; and remember to avoid choosing the wrong domain name or using the free domain name that will be a challenge to your reader.
For instance, if you name your blog “Weekend Travels,” it’s too narrow, and you’ll be limited as to the number of topics you can talk about since they’ll all be trips that can be taken over the weekend. But, a name like “World Travels” will give you greater freedom to write about a broader range of topics.
3. Keep It Short
Short and sweet is always best. Make sure your name is straightforward to remember. To come up with a unique blog name, people often end up including long, complicated, or even foreign words.
But that’s never a good idea. So instead, please keep it simple so it’s easy for your audience to remember and type your blog name in their browsers.
4. Use Alliteration
If you can, use alliteration for your travel blog name. Alliteration is when you have two or more words in a row with the same first letter or the same sound. For instance, your travel blog might be “Travel Tales” or “Travel Marvel.”
5. Get Creative with Your Domain Name
Most domain names you want will already be taken, especially the short one- or two-word names. This means you’ll have to get creative if you don’t want to have a super long blog name.
One way to do this is to use a thesaurus, type in each word in your blog name, and get the different words with the same meaning to find something that fits together.
6. Add Extra Words
If all else fails, simply add extra words like “the “club, “hub, “world,” etc. For example, if you wanted the blog name “Packable Life,” you could add “the” to make it “The Packable Life.”
7. Think of a Concept
When choosing a domain name for your travel blog, something else to consider is to think of a concept for your new website. Imagine what it could be in the future and how it could be branded. This will help you come up with relevant ideas for names.
8. Use Name Generation Tools
If you’re still stuck and can’t think of a name for your website, you can use domain name generation tools like Lean Domain Search, Name Mesh, and Instant Domain Search. All you have to do is enter a word, and these tools will spit out dozens of ideas that you might not have thought of otherwise.
9. Don’t Purchase a Domain Name
This is one of the major mistakes people make when trying to understand how to start a travel blog. They see a name they like on offer for hundreds (or even thousands) of dollars, and they go out and buy it.
That’s a bad idea. You don’t have a business yet, so why spend so much on a name? Instead, when starting a travel blog, you can purchase a regular domain name for just $10 or $20/year and then spend the rest of your money blogging on creating content for a new business.
Later, when you’re profitable, you can then consider purchasing any domain name you want.
10. Don’t Get Stuck at This Stage
Many people and most bloggers spend so much time trying to choose the perfect domain name for their new travel blog when learning how to start a travel blog that they never make it past this stage. Don’t let this happen to you.
Use the tips outlined above to help you figure out a name you like for your travel blogging site, and then move on to the next step.
Don’t spend more than a couple of hours on this when you have started blogging. Otherwise, you’ll fall prey to over-analysis, which is super stressful and a waste of your mind space.
5 Examples of Travel Blog Names (and why they make sense)
Here are a few examples of popular travel blogs to help you with ideas when starting a travel blog and a short explanation of why each domain name makes sense.
1. Nomad Revelations

This name was chosen to appeal to travelers who want the nomadic experience with travel blogging tips. It covers a wide range of locations across all six continents.
2. Expert Vagabond

This travel blog has a unique and exciting name, fitting because the creator produces content of the same caliber.
3. The Poor Traveler

This domain name makes it clear that the travel blog is for people who want to travel the world on a shoestring budget
4. Alex in Wanderland

This clever play on words makes for a memorable travel blog name.
5. The Points Guy

This travel blog is focused on financially conscious travelers, as is made clear by the name.
Step 5: Buy Your Domain Name and Hosting
Now that you’ve chosen your domain name, it’s time to purchase the domain name and domain hosting from many different hosting companies when starting a travel blog.
A domain name is simply the online address visitors will type into their browsers to get to your travel blog.
Domain hosting is an online service that hosts your travel website files on its servers to ensure that your WordPress site is always available online.
As a travel blogger myself, I’ve created a detailed walk-through of the entire process of purchasing your domain name and hosting from hosting companies.
First, click this link to visit Bluehost and follow along with the tutorial below:
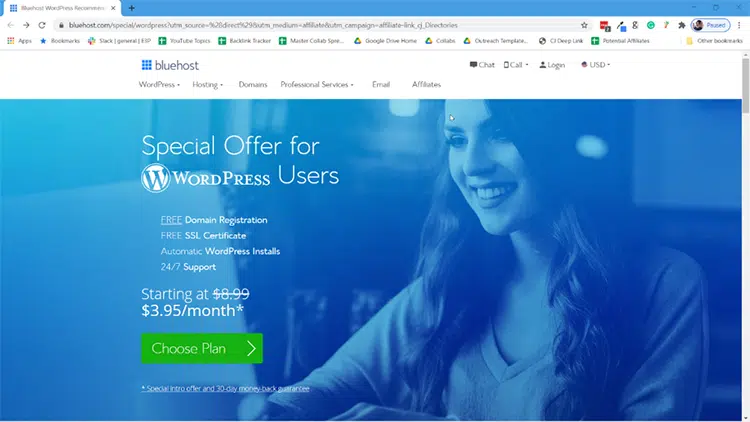
Step 1: If you haven’t yet, click on this link, and you’ll be brought to the WordPress Hosting page that you see below.
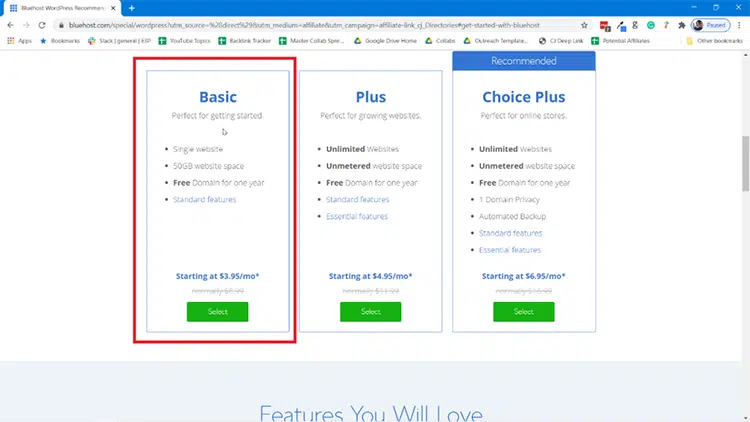
Step 2: Next, you’ll be brought to the web hosting plan page of the hosting company Bluehost. You could choose to get a “Plus” or “Choice Plus” plan, but that’s not a requirement.
The Startup plan is the cheapest at $2.95/month through my link vs. the normal $8.99/month. This plan of this cheap web developer has everything you need as a travel blogger, including 50GB of webspace (plenty of room for your files), a free domain for a year, plus other standard features like a free SSL and a secure WordPress install where you can access your WordPress Dashboard.
Feel free to browse a bit to decide on the right plan, but rest assured that Basic Plan will work just fine if you want to minimize your investment.
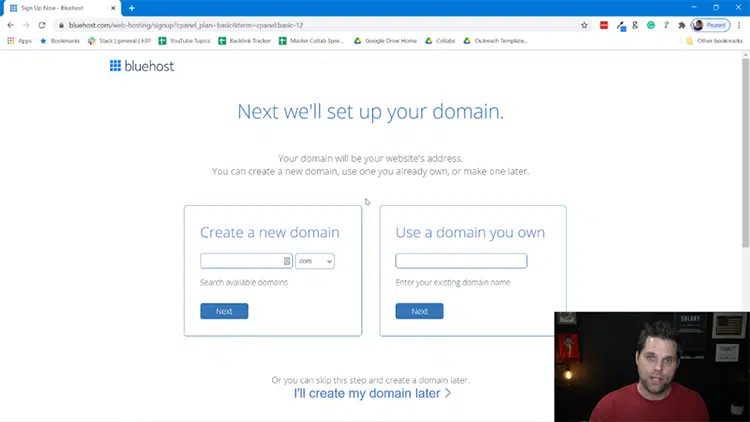
Step 3: After clicking on the plan, you’ll be brought to the next page where you will type in your new domain, or you can just choose “I’ll create my domain later” if you haven’t decided on one yet. The domain is the URL people will type into a browser to view your travel website in the future that you bought from the travel blog hosting company.
Step 4: Once you submit, the next page will ask for your information. That will start with your account information, which is self-explanatory.
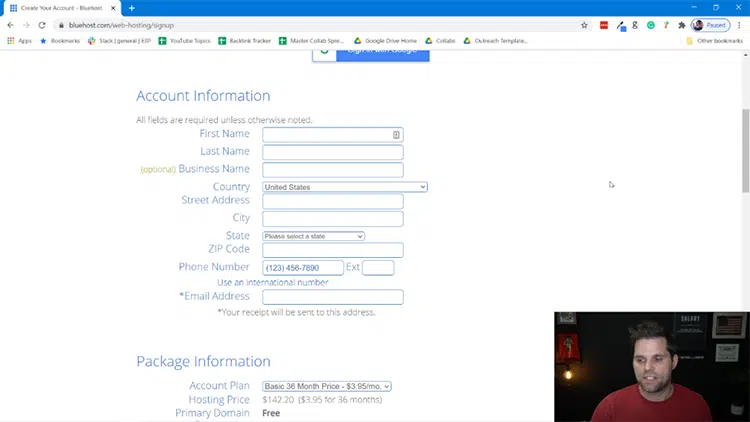
Step 5: Next, you’ll have to input your Package Information. This is to choose how long you want the hosting plan. I advise you to choose 24 months to get the discount and save some money, but you can go as low as 12 months.
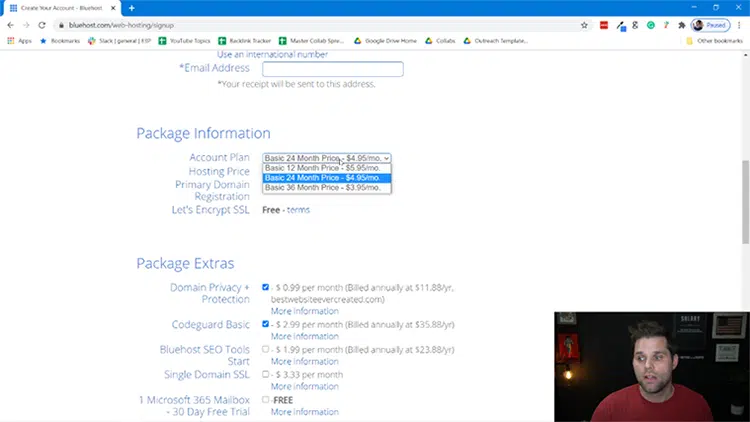
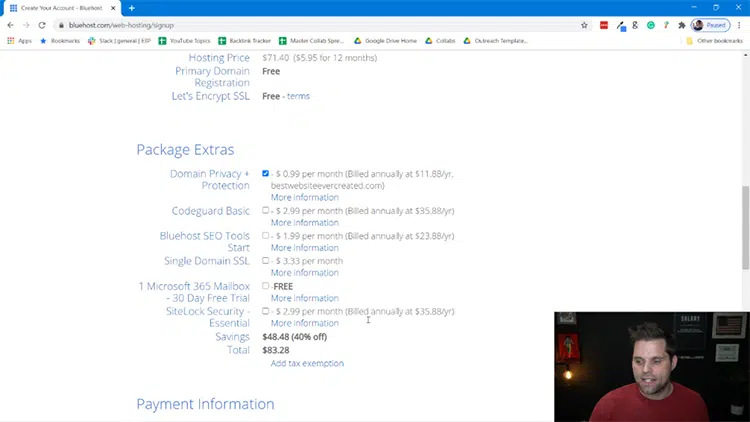
Step 6: Next, you’ll have to choose what “Package Extras” you want. You can scroll over “More Information” to understand each of these items, but here is my advice.
I would get the “Domain Privacy + Protection.” This makes it so that no one can tie your own name to the domain name you create. The only other one worth considering is “Codeguard Basic.” The other two I wouldn’t personally get. But choose what is best for you.
Step 7: The next step is Payment Information, which is self-explanatory.
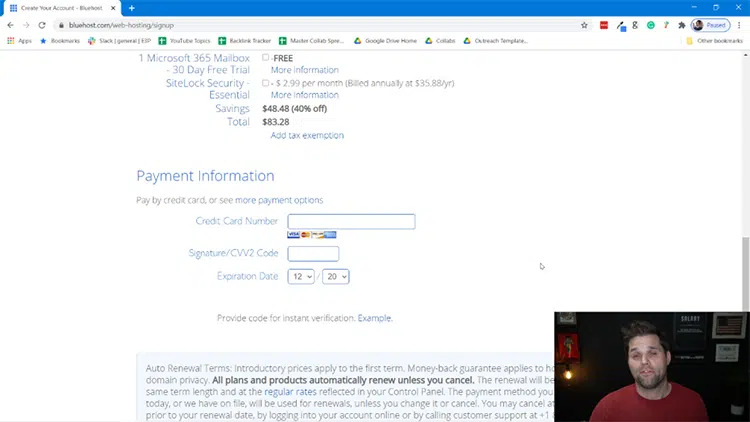
Step 8: The last signup step confirms that you read and understand the Bluehost Terms of Service, Cancellation Policy, and Privacy Notice. Click the check button and then click “Submit.”

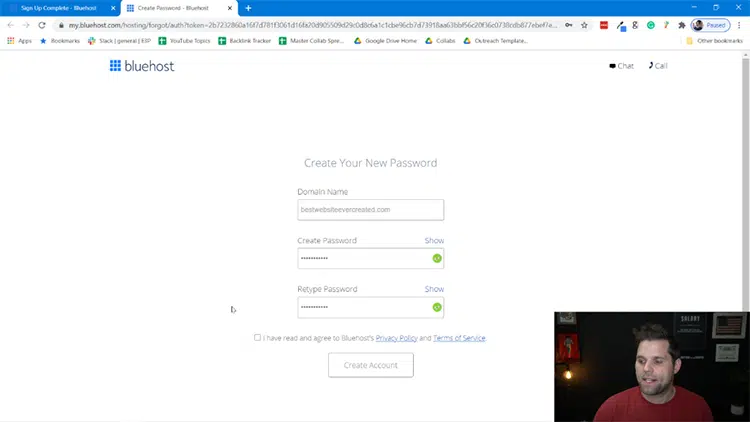
Step 9: Next, you’ll be prompted to create an account and password. You’ll use this information to log in to the Bluehost platform to manage your site and account info.
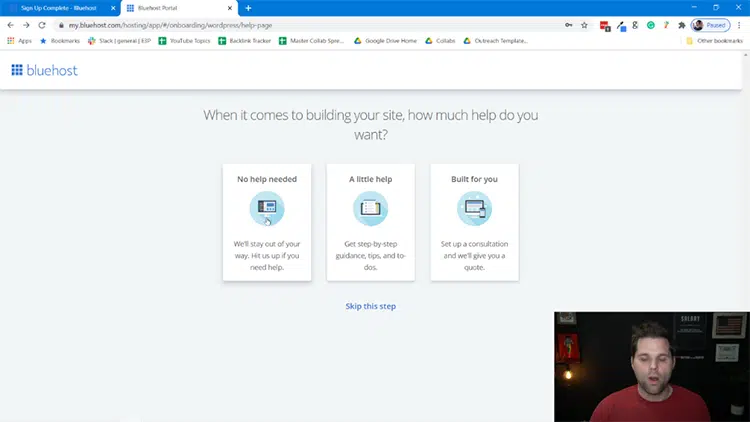
Step 10: At this point, Bluehost puts you through a short questionnaire to better understand your scenario. You can answer all of these questions or click “Skip this Step” at the bottom. If you’re a newbie, I advise you to answer the questions as it’ll help your onboarding experience.
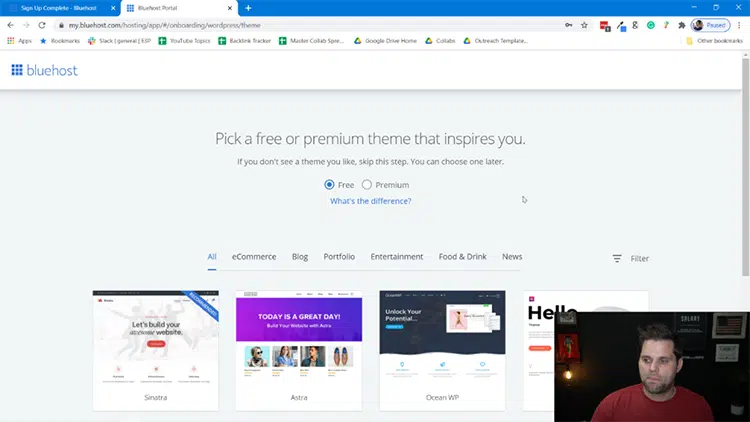
Step 11: After you’re done with that, you’ll be advised to choose a premium theme. For now, you can decide to use a free theme. You can always replace the theme later if you’d like.
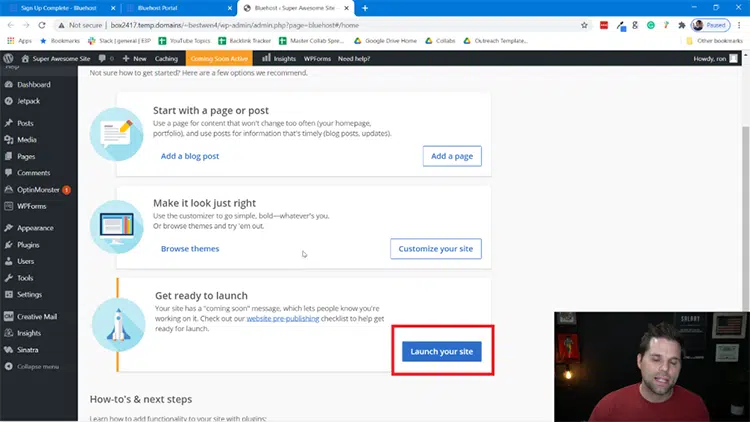
Step 12: You’ll be brought into the backend of WordPress in the admin panel. This is where you’ll manage your site from. You can add posts/pages as you see fit, but when you’re ready, click on the blue button that says “Launch Your Site.”
Step 13 (Final): Your Travel blog is LIVE. Just go to a browser and type in your domain name. Once you do this, you’ll be able to access your website!
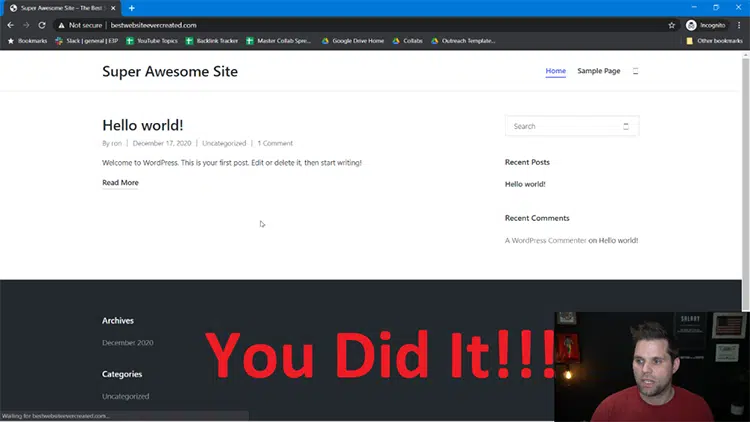
Congrats! You officially have a website and are on the right track to being a successful travel blogger!
Step 6: Choose and Install a Theme For Your Travel Blog
Once your WordPress is installed, it’s time to choose a theme for your travel blog.
Learning how to start a travel blog will always be a challenge, and choosing and installing your theme proved daunting since a theme is a design template that determines how your blog looks.
A theme is a pre-made design for your blog that allows you to create a travel blog precisely the way you want, with menus, a left sidebar, layouts, a logo, featured images, and various other design elements and branding elements in your WordPress dashboard.
This way, you can create a travel blog that’s unique and authentic for your target audience.
You can choose from free themes and paid ones when you start a travel blog. However, I recommend choosing a premium WordPress theme as it comes with many advantages that will help you build a successful travel blog.
Here are some things to look for in a good theme when you create a site:
- Speed
- Beautiful Designs
- Mobile Responsiveness
- Customization Features
- Well-known Brand
- Positive Reviews and Ratings
- Reliable Support
The good news is that all WordPress themes meet these criteria, and the best thing about them is that you don’t need any coding experience to build stunning professional websites. Instead, you can use a simple drag-and-drop editor to customize the different aspects of your theme with valuable tips from the platform for you when starting a travel blog while you do actual traveling.
To help you search for a new theme, below, I’ve listed a few high-quality WordPress themes for building unique travel blogs.
Travel Blog Theme Options for WordPress
- Divi: If you’re looking to design a stunning website with ease, Divi from Elegant Themes stands out as arguably the best WordPress builder available today. Its intuitive visual drag-and-drop interface empowers users to craft amazing sites quickly. What sets Divi apart is its vast array of customizable modules, real-time design feedback, and a responsive editing feature that ensures your website looks impeccable on any device.
- Astra: While Divi is renowned for its versatile design capabilities, the Astra theme offers a distinct set of advantages for those prioritizing speed, performance, and seamless integration. Astra stands out for its feather-light weight, ensuring that websites load at lightning-fast speeds—a critical factor for SEO and user experience. Moreover, Astra’s deep compatibility with major page builders, including Elementor and Beaver Builder, means that users aren’t restricted to a single design environment. The theme is also built with a focus on customization as well. You can read my Astra Theme Review if you want to learn more.
- Themeforest.net: Themeforest has a significant amount of themes far beyond other platforms out there. There are over 48,000 total themes available on this platform, so you can find whatever you need.
If the above list doesn’t do it for you, below are some further ideas.
1. WPVoyager – Travel Blog WordPress Theme

This is a premium travel blog theme for WordPress. It has a bold modern feel designed to attract eager travelers.
Among other features, it comes with Google Maps integration so that you can showcase different map displays from across the globe.
It also comes with support for KML, a file format for displaying geographic data in mapping apps like Google Maps for mobile.
2. Roam – Travel & Tourism Theme

This SEO-optimized travel blogging theme from Envato is perfect for all types of travel businesses. It comes with free plugins, including Slider Revolution and WP Page Builder.
With one click, you can import a full Roam demo website, and the powerful admin panel makes it extremely easy even for non-technical people to manage their website.
3. Trawell – A Travel Blog WordPress Theme

Trawell is a stunning travel blogging theme with intelligent features for building a unique travel blog, including a wide range of carefully crafted page templates to match different personal tastes.
With this theme, you’ll be able to take your travel storytelling for your dream job to a whole new level with flexible, highly customizable layouts that are fun to configure.
4. Travel Tour Booking WordPress Theme

This is a professional travel blogging theme designed for travel agencies, tour operators, and travel bloggers of any size.
It comes with a ton of flexibility for setting up tours, including as many tour attributes as you want. You can then use this data to set up a search form on your website.
The theme is responsive and has unlimited color schemes. It also comes with many integrations with marketing tools like Mailchimp, WooCommerce, WP Page Builder, etc.
5. Backpack Traveler – Modern Blog

This travel blogging theme is powerful and easy to customize. You can integrate Google Maps onto any of your blog pages with a single click and simply pin the destinations from your posts directly onto the map.
There’s a wide range of stunning post variations, including beautiful single post templates and a variety of blog list styles. You’ll also find eye-catching blog sliders and features for editing videos, audio recordings, and more in the professional theme.
Step 7: Create Essential Pages and a Logo
Once you’re done installing a WordPress theme, the next step on how to start a travel blog is to create the essential pages and publish them so your audience can easily find the information they need on your site and does not need to go to the site’s settings.
Navigate to your WordPress dashboard and click Pages > Add New to add a new page. You can then name your page, add content, and click “Publish.”
Here are some of the essential pages to include:
About Page
This page tells readers more about you. You don’t have to go into too much detail at just the beginning. Simply give them the basics, like who you are, why you started a travel blog, what your goals are for your blog, your travel blogging journey, and so on.
Contact Page

On this page, share information that will make it easier for your audience to get in touch with you, such as your email address, phone number, Skype, social media handles, etc. Add a contact form so readers can get in touch with you without leaving your website.
Privacy Policy Page

Any blog that attracts readers from jurisdictions with privacy laws needs to have a privacy policy page that outlines what types of information you collect on your blog and how you intend to use that data.
It’s a good idea to get a privacy policy drafted by a legal professional to ensure that you comply with the laws protecting your readers’ privacy rights. Check out my list of privacy policy generators for free and paid options to help. You may want to create a cookie policy as well.
Create a Logo for Travel Blogging
Once your essential pages are created, it’s time to create a logo for your travel blog. A high-quality logo will make your blog instantly recognizable to your readers, and you can use one of these resources to create a travel blog logo you’ll be happy with.
Step 8: Begin Blogging
When it comes to creating content for your travel blog, you might feel that with the number of travel blogs already out there, everything’s been said about all the exciting destinations one could visit.
But that’s not true in our steps on how to start a travel blog. While there aren’t many destinations left undocumented, you have not documented even the most popular ones.
Your journey is unique, and if you can add your unique personality and style to spice up your stories and adventures with your brand of storytelling, your travel blog will stand out from all the rest.
Here are a few suggestions for what you might write about:
- List Posts or Listicles: You might create lists of the best destinations to visit for readers in your niche
- Interview Posts: Conduct interviews with famous travel bloggers in your niche
- Image or Video Posts: Not every post requires text, and some of your blog posts can be comprised of images or videos from specific destinations.
When getting started writing helpful articles for your blog, try to pick topics from different travel categories. Make sure you have travel-focused posts on the topics around your niche and informational content.
Keep in mind that people use the internet to answer questions and solve problems. So, share as many of your amazing adventures as possible and ensure that your posts help your audience somehow.
For instance, maybe you can help them create similar experiences for themselves by showing them how to get there and giving them all the information they need, including:
- Addresses
- Which trains to take
- What stop to get off on
- How much do tickets cost
- Where to buy tickets
… and any other thoughtful, in-depth advice you can share to help them create their own exciting travel experience.
If you get stuck for topics or categories to write about, simply visit other successful travel blogs in your niche to get some inspiration. Also, check out their social media to see which posts are shared the most and get the most engagement.
Write and publish at least ten blog posts on your blog before promoting anything so that new visitors to your site won’t find a sparsely populated, unprofessional-looking blog.
You can write exclusive travel tips, talk with a successful travel blogger or a professional travel blogger, and build a personal brand to earn money blogging and doing what you love!
The more high-quality and diverse posts you have on your blog when you begin promoting it, the more eyes you’ll be able to bring to your content.
Pro Tip: As a travel blogger, you have to master the art of photography.
You need to take good photos and learn how to edit them because no matter how good a writer you are, your words will always fall short of describing a destination, and you will need to show your readers images of the place you’re talking about. The easiest way would be to find downloadable photos and start editing them. This will save you time and, at the same time, give you a space to create your own design.

Step 9: Promoting Your Travel Blog
Publish and pray isn’t the best strategy for your travel blog. Learning how to start a travel blog was not complete without promoting it. Fortunately, there are many different ways to promote a blog like what other travelers do, and below I’ve listed some of the most effective ways that work particularly well for travel blogs.
Tell Friends and Family
The easiest way to begin promoting your awesome travel blog after it is published live is to share it with your friends and family.
This is a great way to get the word out about your new travel blog and get visitors to it. To be on the fast track as a successful travel blogger, you can ask everyone in your network to share it with their own circle of friends and family to give you even more exposure.
Social Media
Social media continues to be one of the best ways to promote a new blog. If you already have profiles on different platforms, leverage those to get the word out about your recent travel blog.
If not, create profiles on the platforms where your target audience hangs out and start posting exciting snippets, images, etc., from your blog post to direct readers to it.
Pinterest, in particular, is a great site to use as a travel blogger. Unfortunately, your posts on Instagram, Twitter, and Facebook will soon be buried under newer, fresher posts. Still, your pins have a much longer lifespan, which makes this social media site essential for getting a travel blog in front of more eyes; even Google analytics can help you search for critical information to post on social media.
Groups and Forums
Social media groups and online forums are great ways to promote your new blog. Search for [your niche] + [group/forum], and join relevant groups in your specific travel niche.
Interact with other users, and over time, you’ll be able to include a link in your bio or within posts in your discussions to get people to visit your blog, and you can avoid spam comments from bots on the internet.
Search Engine Optimization (SEO) for a Successful travel blog
Search Engine Optimization (SEO) is one of the best ways to drive traffic to your blog. However, it takes a while to start to see the results, mainly if you are a beginner. You can also use Yoast SEO plugins and other essential plugins and tools.
To learn more about SEO, sign up for a free travel blogging course to make your life a lot easier (and your blog a lot more successful) in the long run; Yoast SEO and Google analytics can also help you learn your SEO information can use.
Guest Posting
Guest travel blogging is where you write for other blogs or other bloggers in your niche to build your reputation and get more organic traffic to your own site.
Search online for “Guest Posting” + “Write for Us” or “Submit Guest Post, “etc. Then, make a list of a few popular blogs and travel sites in your niche that you will write for over the course of the next few weeks or months.
This puts your content in front of brand-new audiences, and the more consistent you are with this method, the more traffic you’ll bring to your new blog.
Paid Ads For Your Own Blog Post
Google is the primary source of traffic for most beginner travel bloggers to their blog posts and ad space. But, if you have the budget for it, it’s always a good idea to invest in bringing a steady stream of traffic to your new blog.
This will help you to grow at a much faster rate. You can start with advertising on social media, including Facebook Ads, Instagram Ads, Twitter Ads, etc.
Step 10: Start Making Money
Once you’ve mastered the art of driving traffic to your travel blog, it’s time to learn how to make money as a travel blogger using some of the most influential blog monetization methods for travel blogs; this is an important step in how to start a travel blog – making money.
These include:
Ad Networks

(Source)
To start earning ad revenue, you can join Google AdSense or other ad networks like Newor Media (Read my Newor Media review here), Media (dot) net, Adsterra, etc.
Once your account is approved as a growing and successful blogger, the ad network will begin showing ads to your blog visitors, and you’ll be paid for every ad view or click. Over time this will become a steady stream of passive income that grows as your blog and audience grow.
Affiliate Marketing

(Source)
Affiliate marketing is essential to building a successful travel blog that involves promoting other people’s products or services to your own blog audience. Each time a sale is generated, you are paid a commission.
As a travel blogger, you can join affiliate programs like TripAdvisor, Booking (dot) com, and Amazon Associates to sell everything from flights and hotel stays to travel gear, insurance, etc.
You can also sign up for referral programs of websites or apps that you like and promote them on your blog. For example, the app Honeygain offers a referral program, where you receive a share of profits from each referral you bring. It’s perfect for bloggers with audiences. It is also a completely passive way of earning money.
Sponsored Posts
Sponsored posts are a great way to help you make money blogging as a travel blogger and become a successful travel blogger. You can write posts or product reviews for other businesses and use essential plugins and charge a specific fee or accept free products, sponsored trips, etc., as payment.
Add a “Work with Me” page to your website to help you attract partners for sponsored posts/trips.
Just make sure that when you publish your first blog posts that are sponsored on your website, the topics are aligned with your chosen niche. Otherwise, you risk confusing your readers.
Product Reviews

(Source)
As a travel blogger, you can monetize your blog by writing product reviews for different brands. Typically, successful travel bloggers get a ton of free products, including hotel stays, flights, travel gear, etc.
You’ll find your opportunities for free things grow as your successful blog and audience expand. You can even use Google search and Google Analytics, which feature detailed analytics to help you find products to review and gain more audience.
Selling Travel-Related Products
Yet another effective way to profit from your travel blog is by selling travel-related items your readers will appreciate. This can be anything from e-books, travel blogging courses, selling an online course, and paid webinars to travel photos, printables, virtual tours, travel apps, and more.
In addition to digital products, you can also sell physical products such as apparel, mugs, diaries/notebooks, and branded merchandise while travel blogging.
Members-Only Content
Another great way to monetize your travel blog is to create a membership portal where paying members can access unique content and resources such as stock photography, videography, how-to guides, tips, tricks, etc., that you don’t publish to the rest of the blog.
This is an effective way to create a source of recurring revenue while travel blogging, but it requires that you create membership content regularly for your brand-new travel blog
Freelance Writing Travel Blogs
Successful travel blogger supplements their blog income by writing for other publications. The travel industry often pays well, and you’ll find lots of work on websites like Matador Network, Lonely Planet, Go Nomad, Transitions Abroad, National Geographic Traveler, and many others.
In addition to freelance writing, you can sell many other services on your new blog.
For instance, as you work to build your travel blog, create a blogging course, write travel tips, or join a support forum, you will be developing a lot of marketable skills, such as social media management, web or graphic design, word of mouth marketing, email marketing, city blogging, Google Analytics, SEO, and many others. Beyond that, you’ll be using additional tools such as SPF Authentication for emails, social media coverage, planners, etc.
There are plenty of people out there who are willing to pay for those skills, and this will help you with making money while your blog continues to grow.
Bottom Line About Starting a Travel Blog
When you start writing a travel blog, it can be scary, especially if you’re doing it now when the world is still dealing with the effects of the global pandemic.
But, with this strategy in hand, you have everything you need to build and grow a profitable blog.
And remember, travel blogging takes time, and the hard work you put in now will yield phenomenal results in the coming months and years.
I have been new in content marketing for around 6 months, but I still struggle with how to write good content that converts.
I found this guide very helpful for me you did great deep research
Glad it helped!