

You’ve spent hours, days, weeks, perfecting the art of photography. Your photographs have the power to evoke a thousand emotions. You’ve captured the quiet hum of dawn, the roaring energy of a bustling city, and everything in between.
But there’s one piece of the puzzle that’s still missing – how to share what you’ve captured with the world. The answer is a photography blog.
Read on to discover everything you need to know about how to start a photography blog – and make extra money blogging.
Editors Note
This guide is extremely DETAILED and explains everything you need to start a photography blog. I’ve been at this blogging stuff for over 8 years and have built a business making $20,000 per month, so I have a lot of helpful advice for you newbies out there.
If you get stuck or need advice, I HIGHLY recommend that you get my 100% FREE blogging course by clicking here. If that doesn’t help please contact me directly and I’ll help you out for free.
How to Start a Photography Blog in 10 Steps:
If you just need someone to walk you through the process of setting up your blog quickly and easily, check out step 5.
In the U.S. alone, over 250,000 people have an interest in photography. With a market size of over 12.5 billion dollars, revenue from the photography industry is set to increase by 1.3% by the end of 2023. This means that there has never been a better time for professional photographers and hobbyists to start a blog than right now.
There are tons of reasons why you should start a photography blog. The main one, of course, is for the love of it. Most people who are interested in finding out how to make a photography blog say that they want to showcase their abilities as photographers in order to either start a business or simply share the world through their lens.
But, there are other reasons, too:
Create a Photography Business: If you are a professional photographer, having your own little corner of the internet will allow you to showcase your work. You will also be able to leverage SEO (search engine marketing) to attract more customers. Blogging for photographers is similar to blogging for other artistic niches, including music, art, 3D design, and others. It’s one of the best ways to showcase your work and spread the word about you and your brand.
Improve Your Personal Brand: Even if you’re just starting out on your journey to become a professional photographer, a personal blog will help you get started on the right foot. By the time you become a full-fledged pro, you will have built a strong brand for yourself.
Up-to-date Portfolio: Many photographers tend to let their portfolio sites get stagnant, but with a blog, you will be able to showcase your latest and greatest images, as well as show your clients what your current shooting style is (it tends to evolve over time).
Store Your Images: A photography blog is a great place to store all your awesome images for all your photography projects. A blog will help you stay organized so you can bring out your unique vision instead of letting your greatest work get lost to the world.
Are You a Hobbyist?: A blog will make it easy for you to share your images with your family and friends, or with the world. And the best part? You may still be able to earn an income even if you’re just doing photography as a hobby.
Although it may seem overwhelming at first, launching your own photography blog doesn’t have to be hard if you have a step-by-step plan – and that’s exactly what you’ll discover below.
1. Decide the Focus of Your Photography Blog
What is a Photo Blog?
Starting a photography blog will require you to come up with the main topic or focus of your blog. A photo blog allows you to chronicle your photographic journey, post high-quality images regularly, and tell the stories behind them. Imagine your photo blog as an open gallery, inviting visitors from across the world, each picture a conversation starter, each post an exploration of your artistry.
But it’s also more than just a platform to display your work; it’s a personal corner on the internet where your photos breathe life, convey emotion, and connect with your audience on a deeper level.
The power of a photo blog cannot be understated, especially if you have a keen eye for catching the most breathtaking shots. It’s also a great potential source of income; your work gets noticed and you may suddenly find yourself being able to earn from photography by selling your work or getting sponsored to take specific photos.
But, the first thing you must do is decide on the direction or focus of your photography blog. You may already have some ideas about what you want to write about. But they may cover a massive range of topics.
If you’re going to build a successful photography blog, you’ll need to decide on a specific focus for your blog.
You cannot try to be everything to everyone. When it comes to blogging (and especially photography blogging), that’s the fastest route to failure.
So, take the time right now to brainstorm a few ideas for the focus of your photography blog.
- What exactly do you want to write about?
- Who do you want to be writing for?
- What is the outcome you hope to achieve with your blog?
You may have diverse topics that seem unrelated, but do your best to put these into similar groups, and you’ll have an easier time narrowing the focus for your blog and making those random topics come together in a way that will appeal to your audience.
Here are some ideas to help you with your brainstorming process:
- Film Photography Blog
- Boudoir Photography Blog
- Travel Photography Blog
- Food Photography Blog
- Fashion Photography Blog
- Street Photography Blog
- Cinderella Photography Blog
- Food Blog Photography
- Family Photography Blog
- Newborn Photography Blog
- Maternity Photography Blog
- Lifestyle Photography Blog
- Landscape Photography Blog
- Nature Photography Blog
- Aerial Photography Blog
- Wildlife Photography Blog
- Sports or Action Photography Blog
- Portrait Photography Blog
- Architectural Photography Blog
- Event Photography Blog
- Wedding Photography Blog
As you can see, the options are endless. Consider what it is that you’re passionate about, and once you’ve decided on the focus for your new photography blog, it’s time to niche down on that topic. You may even want to start your blog teaching others about photography.
You could even have a photography blog for the sole purpose of increasing sales on another platform you use to sell products, such as Poshmark.
2. Choose Your Photography Blog Niche
Even after choosing the focus for your blog, you still need to dig deeper. For instance, if you choose Event Photography, that is still a wide topic that covers a lot of different subjects. You don’t have to do it all, but you can choose a part of it that you will do extremely well.
People, Animals, Buildings, or Objects – totally different skill sets are needed to photograph each. Contrary to many people’s assumptions, photographers don’t have to be Jacks (or Jackies) of all trades.
Yes, light is light, but there’s a difference between photographing a newborn and photographing a spider.
Here are some ideas to get you going:
Stock Photography: You can focus on selling stock photography. This is a great business model and you’ll be able to start making money immediately by selling high-quality stock photos. You can then write about how you did it on your blog. You can do this on Getty Images, Shutterstock, Envato Elements, and DepositPhotos among other platforms.
Granted, photo storage may be an issue so I recommend you find the best photo management software for your situation.
How to Start a Blog: Choose from the many different photography niches and help others start a photography blog in that niche. You can potentially post dozens of blog posts and add videos and images for any photography niche.
Equipment Reviews: Write reviews on photography equipment and gear. This is something that is easy to incorporate into any type of photography blog. For instance, if you start a blog focused on wedding photography, you can include reviews on the equipment needed for that.
By Device: Create a photography/tech blog. For instance, if you have a love for iPhone cameras, you could start a photography blog dedicated to iPhone cameras and photography such as apps, software, tips, tricks, etc.
By Software: If you’re someone who is adept at Photoshop or any other photo editing software, you can create a blog focused on teaching other photographers how to use the editing tools to remove backgrounds from images, make collages, add effects, and much more in detail.
There are endless options available for you to choose from, and that’s why it’s important to take into consideration what your passion is, as well as all the different topics that you find interesting before you make your decision.
3. Choose Your Blogging Platform
Now that you have your niche all figured out, it’s time to decide on the right blog hosting platform for you.
As part of learning how to start a photography blog, you’ll begin to understand more about blogging platforms. There are tons of different options available to choose from, some free and others paid. But, before you reach for the free blogging platform, it’s important to understand that they come with some disadvantages.
Free blogging platforms like Wix, Blogger, and WordPress.com (which is different from the paid version, WordPress.org) have the following disadvantages:
- Free blogs have poor customization abilities
- They look very unprofessional
- They have limited capabilities
- Free blogs also have low monetization potential
- Your account can be deleted without warning
So, it’s clear to see that you shouldn’t use free blogging platforms if you’re serious about building a successful and profitable photography blog.
What should you use instead?
WordPress.org – the grandfather of blog hosting platforms. This self-hosted platform is used by over a third of websites on the internet. It’s also the option that I use and recommend to all my readers.
Here are some of the benefits of using premier WordPress:
- WordPress is flexible and adapts to changing needs
- The platform is user-friendly, even for total beginners
- WordPress themes offer multiple options for customization
- Free and paid plugins extend your website’s functionality
- WordPress sites are more responsive and rank higher
- All websites come with a built-in blog
- There’s a vast community of supportive users and developers
If that isn’t enough to convince you, take a look at some of the recent statistics on WordPress use:
- WordPress powers over 35% of the internet – a number that is expected to rise in 2020
- Counting only the CMS-built websites, WordPress is used by 60% of them
- WordPress sites get over 400 million visitors every month
- WordPress isn’t just for blogging, over 28% of eCommerce goes through WooCommerce
- An average of 661 WordPress websites are created on a daily basis
When you sign up for WordPress self-hosted platform, you will be able to run your blog on your very own domain. This will help you ensure that you have full control over your blog as well as the ability to monetize it however you wish.
With WordPress CMS, you will be able to quickly set up your photography website featuring a blog, portfolio, booking form, sales gallery, and any other amazing features you want to include.
4. Decide Your Domain Name
Your next step is to decide on your domain name. This is simply what your blog is going to be called. ‘Domain name’ is a fancy phrase for the web address or URL that people will type into Google (or any other search engine) to get to your photography blog.
Any professional branding agency will recommend that you choose the right name for your blog – after all, this will be your identity and your brand on the web.
It’s definitely one of the most important steps toward establishing your very own online photography space, and it’s important to take the time to do this part properly.
However, you should not get stuck at this stage. Set aside an hour or two and follow the steps listed below to help you find the perfect name for your new photography blog.
You can also watch this helpful video to guide you through the process:
Below, I explain how each of the 10 points in the video is relevant to choosing a domain name for a photography blog:
1. Buy a .com Domain Name
I always recommend using a .com for your photography blog (eg. www.YourPhotographyBlog.com). This suggests that you’re international, as opposed to being country-specific. Also, a .com domain name won’t limit you in case you decide to change your market or the locations where you offer your services.
2. Stay Broad With Your Domain Name
Choose a broad domain name that will make it easier for you to expand. Choosing a super-specific URL means that you’ll be limited as to the types of photography content you can blog about, and that prevents you from reaching a wider audience.
3. Keep it Short
When it comes to domain names, shorter is always better. Short domain names are easy to remember. Aim for three words or less. Four at the maximum. Don’t worry about exact-match domain names. Although they are reassuring for your customers to know that they are in the right place, Google doesn’t pay that much attention to them anymore.
So, don’t go for a name like BrightonBabyPortraitWeddingPhotographer.com – that’s just too long. Some people simply use their own name with ‘photography’ at the end (eg. www.JaneDoePhotography.com).
4. Make Sure to Alliterate
This means that you should use words that begin with the same letter or sound, such as Swim Snaps Studio. You don’t absolutely have to do this, but it can be a great way of ensuring that your blog name is memorable to your visitors.
5. Get Creative
Sometimes the name that you want is already taken. That doesn’t mean you should give up. You can use creativity to get a name you’ll love by finding synonyms or similar words that mean the same thing. For instance, if Clear Snaps was the name you wanted, you could opt for Vivid Snaps, instead.
6. Add Extra Words
If nothing else works, try adding extra words like The, Hub, HQ, World, Home, etc. This isn’t always ideal, but it could be the only way to get the name you want. For example, if you wanted the name Lens Hub, and it was already taken, you might call your blog The Lens Hub instead.
7. Think of a Concept
When choosing your domain name, try to come up with concepts or ideas as to how your photography blog could be branded. Thinking about where your blog could go in the future will help you come up with great name ideas.
8. Use Tools
If you are still stuck, use domain name generation tools like LeanDomainSearch, and InstantDomainSearch. There are many others, and you can use their services to come up with a unique and memorable domain name and then purchase it from Namecheap.
9. Don’t Buy an Expensive Domain Name
If you find the name you want for your photography blog has already been taken but is up for sale, it may be tempting to purchase it at a high price. but this is something you should avoid at all costs when you’re just starting out.
Focus instead on using that money to grow your blog, and one day, when your blog is profitable, you can then purchase any name you want.
10. Do Not Get Stuck Here
Oftentimes, people get stuck because they’re trying to come up with the perfect name and they never move past this stage.
As I stated before, don’t spend more than a couple of hours on this. That’s all you need to come up with a few great names for your photography blog. Pick one that you like and move on to the next step.
Examples of Photography Domain Names (and why they make sense).
The Picture Patch: This name is short, unique, and easy to remember thanks to the clever use of alliteration.
Moonlight Photography: This name is short and memorable, and it specifies the photography blog’s niche, which is ‘night photography’.
Click and Shoot: This photography blog for beginners has a name that is short and sweet. It’s extremely easy to recall.
A Fine Portrait: This name tells visitors exactly what to expect when they get to the portrait photography blog.
Wedding Photographers: I’m willing to bet ‘Wedding Photographers’ was already taken, and this wedding photographer used creativity to get a great alternative.
5. Buy Your Domain Name and Hosting
Once you’ve selected your domain name, it’s time to buy the name and your blog hosting.
A website hosting service is comparable to renting business space, only instead of renting physical space, you’re renting on the Internet. Your web hosting provider will keep all your website files on their server and ensure that your website can be found online at all times.
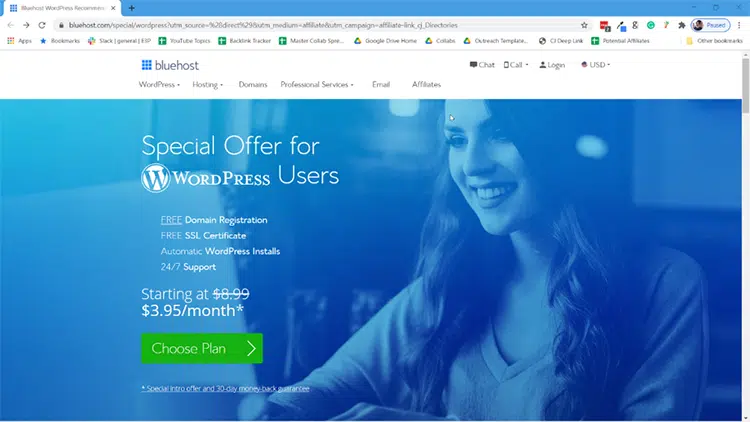
I recommend Bluehost for beginner hosting because they are reliable and they offer affordable prices. Also, they have the best customer support in the industry.
Below is a YouTube video and screenshots showing you the exact step-by-step process, choose whatever tutorial works best for you.
Step 1: If you haven’t yet, click on this link and you’ll be brought to the WordPress Hosting page that you see below.
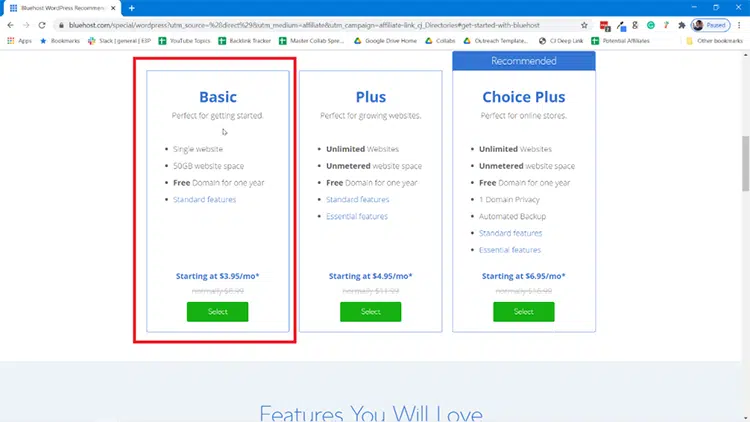
Step 2: Next, you’ll be brought to the hosting plan page. You could choose to get a “Plus” or “Choice Plus” plan, but honestly, that’s not a requirement.
The Startup plan is the cheapest at $2.95/month through my link vs. the normal $8.99/month.
This plan has everything you need including 50GB of webspace (plenty of room for your files), a free domain for a year, plus other standard features like a free SSL and a secure WordPress install. Feel free to browse a bit to decide the right plan for you, but rest assured that Basic will work just fine if you want to minimize your investment.
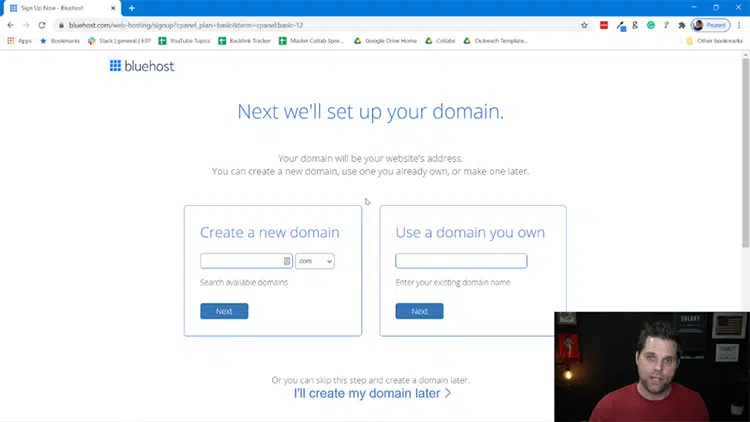
Step 3: After clicking into the plan, you’ll be brought to the next page where you will type in your new domain, or you can just choose “I’ll create my domain later” if you haven’t decided on one yet. The domain is the URL people will type into a browser to view your website in the future.
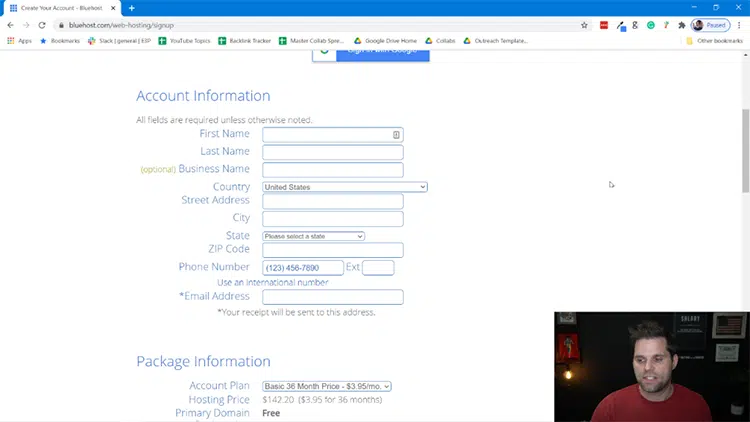
Step 4: Once you submit, the next page will ask for all of your information. That will start with your account information, which is self-explanatory.
Step 5: Next, you’ll have to input your Package Information. This is to choose how long you want the plan to go for. My advice is that you choose 24 months to get the discount and save some money, but you can go as low 12 months if you want.

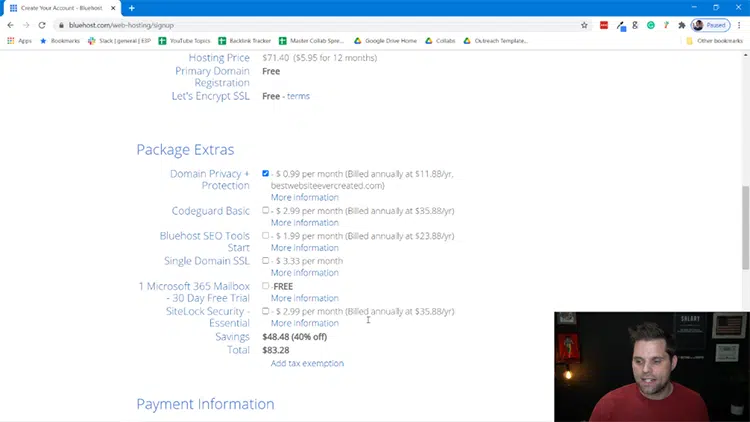
Step 6: Next you’ll have to choose what “Package Extras” you want. You can scroll over “More Information” to understand what each of these items is, but here is my own advice.
I would get the “Domain Privacy + Protection”, this makes it so that no one can tie your name to the domain name you create. To me, the only other one worth considering is “Codeguard Basic”. The other two I wouldn’t personally get. But choose what is best for you.
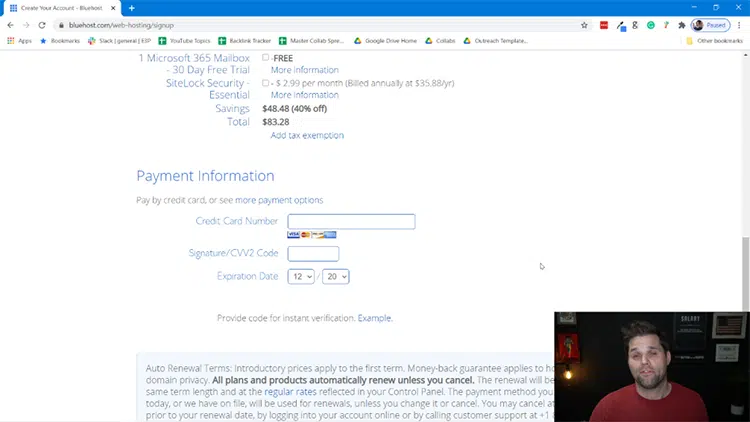
Step 7: The next step is Payment Information, which is self-explanatory.
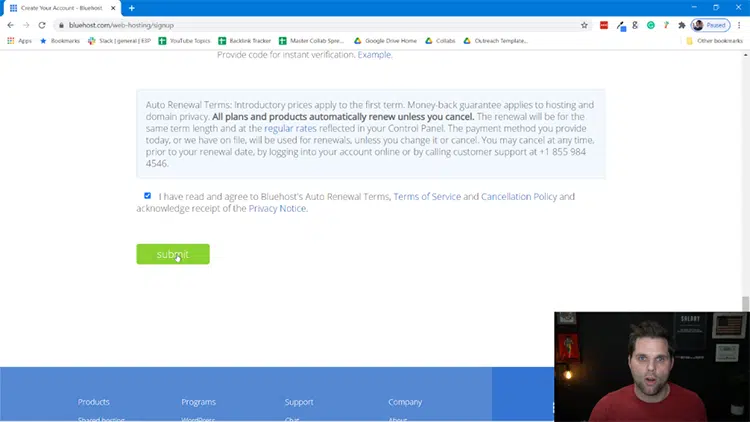
Step 8: And the last step of signup is to confirm that you read and understand the Bluehost Terms of Service, Cancellation Policy, and Privacy Notice. Click the check button and then click “Submit”.
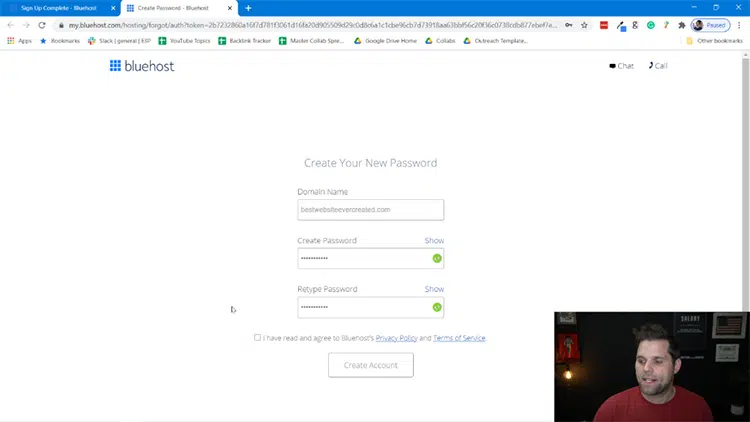
Step 9: Next you’ll be prompted to create an account and password. This is the information that you’ll use to log in to the Bluehost platform to manage your site and account info.
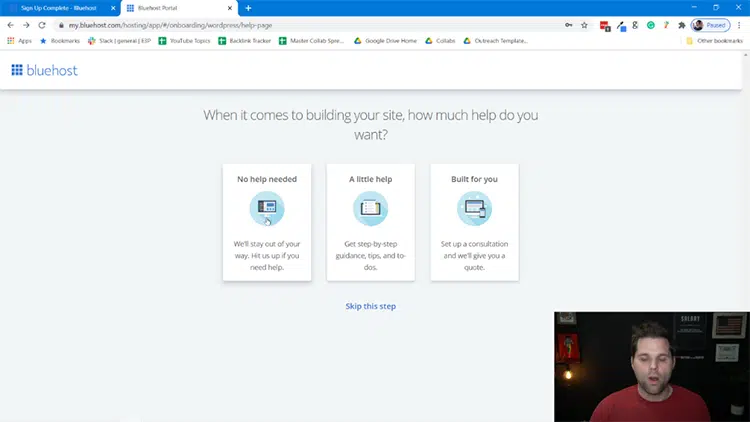
Step 10: At this point, Bluehost puts you through a short questionnaire to better understand your scenario. You can answer all of these questions, or click “Skip this Step” on the bottom. If you’re a newbie, I advise you to answer the questions as it’ll help your onboarding experience.
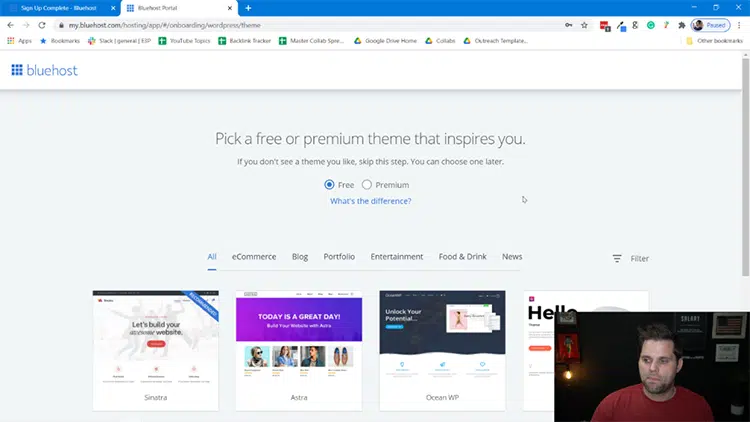
Step 11: After you’re done with that you’ll be advised to choose a theme. For now, you can just choose to use a free theme. You can always replace the theme later if you’d like.
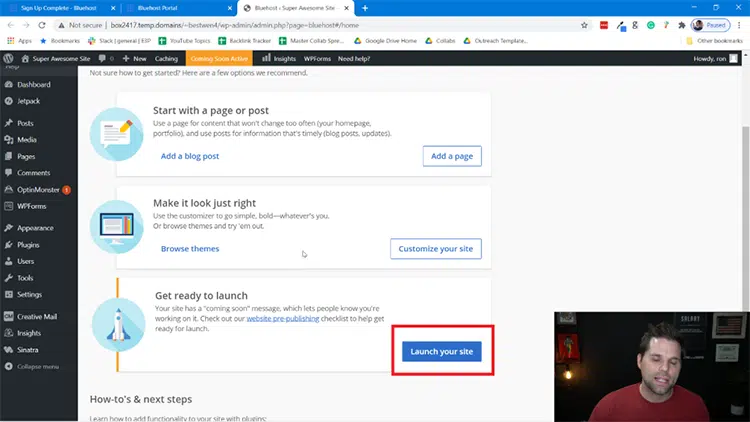
Step 12: From there, you’ll be brought into the backend of WordPress in the admin panel. This is where you’ll manage your site from. You can add posts/pages as you see fit, but when you’re ready click on the blue button that says “Launch Your Site”.
Step 13 (Final): Your blog is LIVE. Just go to a browser and type in your domain name. Once you do this, you’ll be able to access your website!
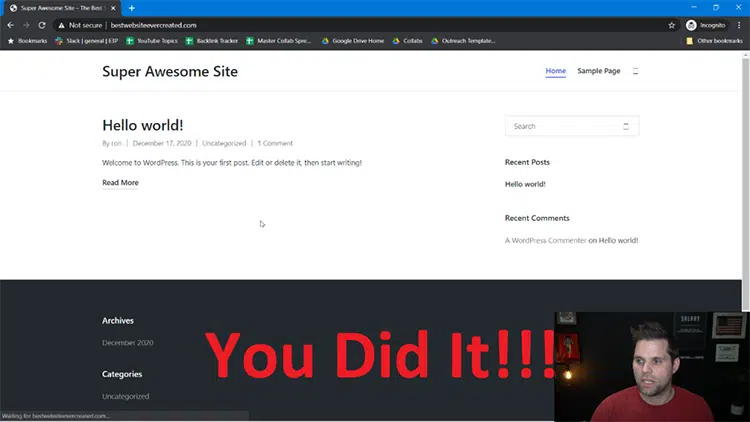
Congrats! You officially have a website.
If you’re wondering how to edit things on the website, all you have to do from here is go to your website URL with /wp-admin at the end in a browser and log in.
Example: http://mostawesomewebsiteever.com/wp-admin
And don’t worry, we cover how to edit things more in the rest of this guide as well. So please continue reading.
6. Choose a Theme For Your Photography Blog
Now that you have WordPress installed, it’s time to choose a theme for your photography blog. A theme is a sort of template that dictates how your blog will look and function. It is an easy way to customize your blog to make it unique.
You should think about the aesthetics & how you want it to look like before starting a photography blog. Even a rough idea can go a long way since you’ll be able to identify the perfect template for a blog on photography.
There are many free and paid themes to choose from. And, as with blogging platforms, free themes have a lot of disadvantages.
For instance, some free WordPress themes come bundled with harmful malware. Also, free themes are extremely hard to customize which means that you won’t be able to make your blog look exactly the way you want it.
Yet another problem with free themes is that they don’t come with technical support in case you have any questions or encounter errors during use.
That’s why it’s vital to choose a paid theme.
The good news is that premium WordPress themes don’t cost a lot. In fact, there are some reliable sites like ThemeForest that offer themes at extremely affordable prices. And when you choose a paid theme, you get the following benefits:
Benefits of Using a Premium WordPress Theme:
- Available technical support
- Full customization abilities
- Great-looking templates for images
- Clean code for a faster website
- Free updates for life
But, there are so many options available to choose from that finding the right theme for your photography blog can prove to be an overwhelming process.
Here’s what to look for in a good theme:
- Fast and mobile responsive
- Beautifully designed
- Customizable to match your style
- Great technical support
- Offered by a reputable brand
- Lots of great online ratings
Now that you know what to look for in a great theme, check out these amazing photography blog themes to get some inspiration:
- Divi: If you’re looking to design a stunning website with ease, Divi from Elegant Themes stands out as arguably the best WordPress builder available today. Its intuitive visual drag-and-drop interface empowers users to craft amazing sites quickly. What sets Divi apart is its vast array of customizable modules, real-time design feedback, and a responsive editing feature that ensures your website looks impeccable on any device.
- Astra: While Divi is renowned for its versatile design capabilities, the Astra theme offers a distinct set of advantages for those prioritizing speed, performance, and seamless integration. Astra stands out for its feather-light weight, ensuring that websites load at lightning-fast speeds—a critical factor for SEO and user experience. Moreover, Astra’s deep compatibility with major page builders, including Elementor and Beaver Builder, means that users aren’t restricted to a single design environment. The theme is also built with a focus on customization as well. You can read my Astra Theme Review is you want to learn more.
- Themeforest.net: Themeforest has a significant amount of themes far beyond other platforms out there. There are over 48,000 total themes available on this platform, so you can find whatever you need.
If the above list isn’t enough for you, here are a few other options. However, I do always recommend the top list to everyone first.
- Stellar Photography Blog Theme
- Ness Minimalist Photo Blog Theme
- The Gentleman Photography and Portfolio Theme
Any of these themes will make your new photography site look awesome. You can also browse through other themes for photography blogs on ThemeForest or StudioPress to find one that appeals to you the most. Just make sure that the theme you choose meets all of the criteria listed above. Also, make sure your images have professional quality by adding photo effects and filters where needed.
7. Create Essential Pages & Logo
Once your theme is in place, it’s time for the next step in learning how to start a photography blog – creating your website’s pages. Before you start blogging, you must first create the essential pages on your website. These include your about, contact, and privacy policy pages.
About Page: Add basic information about yourself and why you started your photography blog. This is something that you may want to alter or add to in the future, so don’t get too hung up on the details.
Just make sure that you let your personality shine through and write in the same tone of voice that your audience can expect from the rest of your blog.
Contact Page: On this page, you need to add information on how your readers, clients, and followers can reach you. This includes email, phone number, skype, social media, or any other means of contacting you that you want to use.
Make sure to include a contact form on the page to make it easy for anyone to reach you quickly with comments, questions, or feedback.
Privacy Policy: This is an important page that every photography blog needs. It explains how you collect, use, disclose, or safeguard your visitors’ information on your website.
You can either draft this yourself or get it done for you by an expert who will tailor this and any other legal pages specifically to your needs or check out my list of the best privacy policy generators for free and paid options to help.
You might also consider adding a creative commons license to your photography blog. This tells people what they are allowed to do with your images and photos.
Create a Logo: Beyond that, it’s also a good time to focus on creating a logo for your photography blog. There are a LOT of different ways to do this, but I’m a big fan of an online logo maker.
These platforms will provide you with a free logo for your blog and if you need high-resolution logo files, you can pay a very minimal amount for access to those files and a few other things.
Once you’ve added these essential pages and a logo, it’s time to start blogging.
8. Begin Blogging
When it comes to photography blogs, there are many topics that you can start blogging about. Below, I’ve listed a few ideas for you to consider. Once you’ve chosen some topics to start blogging about, make sure that you get at least 10 posts written before you start promoting your blog.
This is important for many reasons, but the main one is that when you start sharing your new photography blog with the world., you don’t want to be sending people to a content desert. Also, with at least ten posts on your blog, you’ll also be able to cater to the tastes of a wider audience.
Possible Topics and Categories to Blog About:
Recent Work: Share images on your blog about weddings, travel, portrait sessions, landscape images, or whatever it is that you’re currently shooting.
Most Interesting Work: Alternatively, you can pull some of your most interesting images from your archives to share with your audience.
Answers to FAQs: Provide answers to some of the most common photography questions in your niche.
Personal Experiences: Personal blogging is a great way to connect with your audience.
How-to: Pick any subject in your niche that your readers might find challenging, and create how-to posts to help them overcome those challenges. A blog for photographers, by photographers, is highly beneficial to those who are just starting out, so ‘blogging photography’ this way will provide actionable insights & actions that amateur photographers can quickly pick up.
Adventures: Readers love to live vicariously through your blog. So take them on adventures such as mountain climbing, rock climbing, parachuting, etc.
The type of content you publish will ultimately depend on the theme of your photography blog, but you can’t go wrong with the types of posts listed above.
9. Promoting Your Photography Blog
Blogging photography and displaying your work on your blog is a surefire way to attract potential customers. This may also lead to new business connections, depending on how well your photography blog does. But it’s important to remember not to rush head-first; you should populate your blog with blog posts before you start promoting it.
Once you have at least 10 blog posts published, it’s time to start promoting your new photography blog. Here are 5 effective ways to get eyeballs on your work:
Tell Friends and Family: Your family and friends are most likely to want to support you as you start your journey toward becoming a successful and profitable photography blogger. Ask them to visit your blog, leave comments, share your posts, and tell their own friends about it.
Social Media: Share links to your blog on all your social networks. You can also join groups where your ideal audience is already hanging out and share your links there. Sharing unique and eye-catching images on social media is also a great way to bring people back to your photography blog.
guest posting: Do guest posting on popular photography blogs in your niche. This will help you gain access to a wide audience of people who will be interested in your work as well.
Join Forums: There are many forums dedicated to the discussion of everything to do with photography. Here, you can find others interested in the same things you blog about. Share a link to your blog and ask them to check it out.
Leverage SEO: Focus on writing search-engine-optimized content that will rank high in Google. This will bring highly targeted and free traffic to your blog. Find the important keywords in your niche and include them in the content you create, as well as when SEO optimizing your images. If you’re not sure exactly how to do this, consider using some of these SEO tools.
You’ve worked hard on your new blog, and now that you’re getting a steady stream of visitors coming to enjoy your work, it’s time to think about monetizing that traffic so you can start making an income from your passion.
10. Start Making Money
There are many different ways in which you can earn from photography. You don’t have to try all of them at once. Choose one or two to start with, especially if you’re still learning the ropes of how to start a photography blog.
Here are a couple of methods with which you can learn how to make money with photography.
Affiliate Marketing: You can join several affiliate marketing networks like Amazon Associates and get paid a commission for every one of their products that your readers buy through your recommendation.
Information Products: This is a very profitable business model for many photography bloggers. It involves creating information products, such as ebooks, audiobooks, online courses, and guides to help other photographers achieve certain goals. For instance, you could create and sell an online course on how to use Photoshop to edit images.
Google Adsense: This is the most common monetization method among new photography bloggers. It allows you to start making money as soon as you begin generating traffic by showing them ads on your blog. The amount you make grows as your traffic grows. Keep in mind, there are plenty of Adsense alternatives that pay even more than Adsense does.
Selling Your Own Products: Once you start gathering loyal readers, your sales of physical products can really take off. You can sell stuff like physical prints, beautiful landscape photos, or any other images that you think your audience will love.
Sponsored Posts: This type of monetization will pick up as your traffic levels rise and it involves writing posts on photography gear and equipment for businesses in the niche. For instance, a company that manufactures a camera tripod might send you one and ask you to do an honest review of their product on your blog.
Conclusion
Whether you’re shooting supermodels on the runway, wildlife on the African plains, or a baby in its crib, every photograph reveals your unique voice and the way you approach your art.
And congratulations! You now know how to write a photography blog! Use the tips listed here to start your own photography blog so you don’t deprive the world of the opportunity to enjoy your artistic vision.
hi
thanks for the blogs very useful and good . please share with us more articles .
Hi
Thanks for the blogs very useful and good articles . Keep sharing more photography articles .
Very good advice, there is so much information that is specific which makes it incredibly helpful. This will be one of my best resources to start down this path.
I understand you are showing how to start out in a world like this so I’m just going to poke a little fun at one thing you said. That conclusion, “whether you’re shooting this or that” could definitely be a little more relatable as those are some big things you mentioned there! Especially if you work in the trenches just like us!
Haha just playing a little, I love all the practical tips that you give. It will save me a lot of time compared to figuring it out myself or reading other guides that don’t go very deep into all of this.
Glad you enjoyed, Logan! I hope you found it super helpful 🙂
thanks for sharing this blog..